tp
Developer Guide
Table of Contents
- Design
- Testing
- Appendix A: Product scope
- Appendix B: User Stories
- Appendix C: Non-Functional Requirements
- Appendix D: Glossary
- Appendix E: Instructions for manual testing
- Appendix F: Testing with sample data (from file)
- Acknowledgements
Design
Architecture
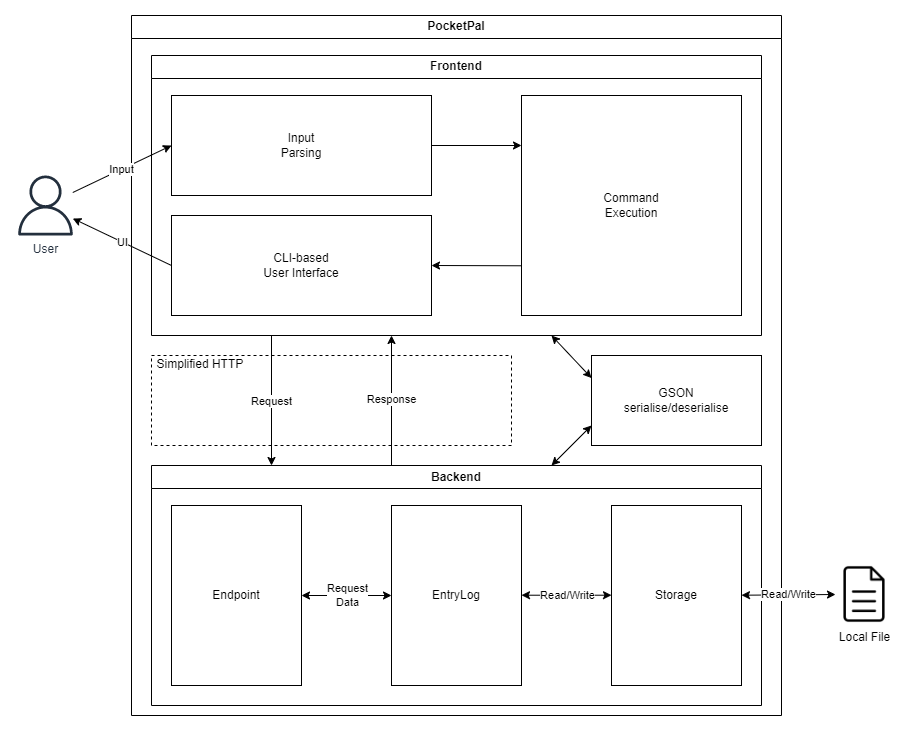
The diagram above illustrates the high-level overview of PocketPal.
Main Components of PocketPal
- The entry point to our application is
pocketpal.PocketPal, which creates theFrontnendandBackendinstances at launch. PocketPalalso sets up logging for the application, which outputs the logs tologs/logging.txt.
Frontend
Frontend is made up of the following components
UI: Handles display of user interfaceParser: Converts text entered by users intoCommandif validCommand: Contains the instructions to be executed as input by the user
Backend
Backend is made up of the following components
Endpoint: The parent component used by various endpoints (EntryEndpointandEntriesEndpoint), where the frontend can send aRequestEntryLog: The main data structure used for temporarily storing multipleEntryobjectsStorage: Reads data from, and writes data to the disk, which can be found atdata/storage.txt
Communication between Frontend and Backend
- PocketPal uses the
Gsonlibrary to serialise and deserialise objects where applicable, such asEntryandEntryLog. - This allows us to standardise the communication framework between
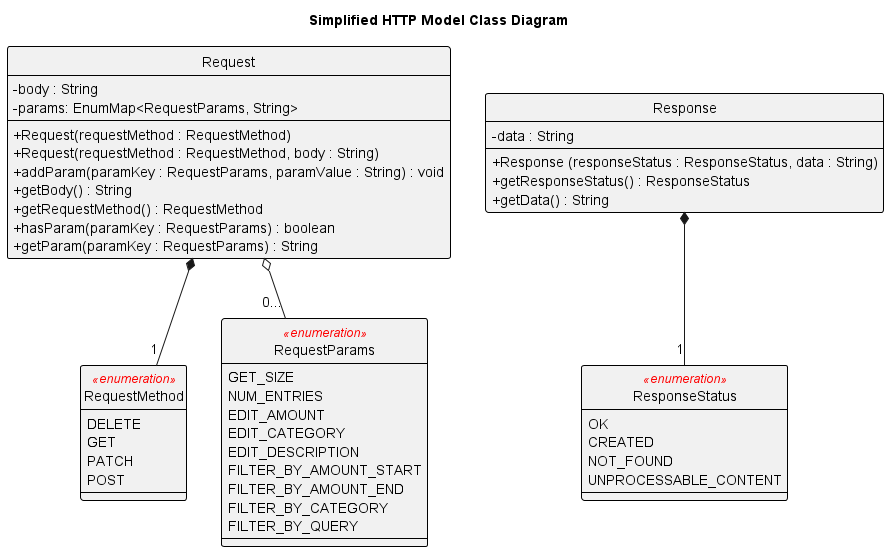
FrontendandBackend, by using a simplified HTTP model. - Each endpoint takes in a
Request, and returns aResponsebased on the requested data.
How the architecture components interact with one another
The following sequence diagram shows how the main components, Frontend and Backend, interact with one another.
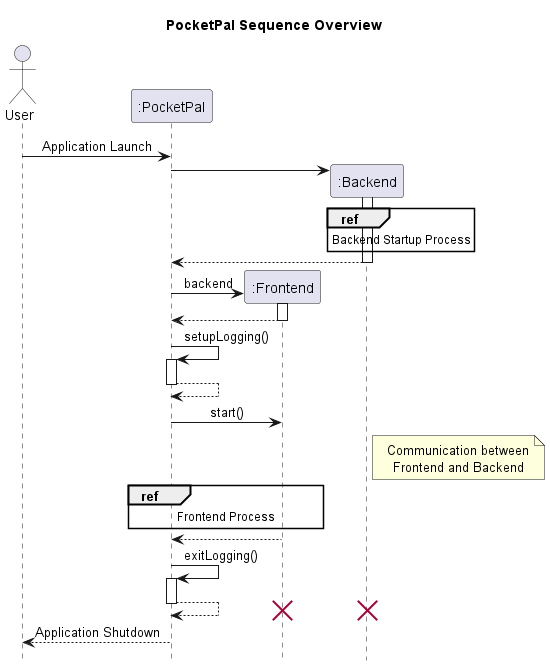
Further design details are documented in the Frontend and Backend sections below.
Frontend
The API of this component is specified
in Frontend.java

- User input and output is handled by
Frontend - The application parses the input given by the user in
Parser - If parsed successfully, the corresponding
Commandobject is executed, which sends aRequestto the appropriateEndpointinBackend(Refer toBackend Request Processsequence diagram) - If the request is successful, the user is updated through
UI. Otherwise the error message corresponding the user’s action is printed instead.
Parser
The Parser class is a fundamental component instantiated as soon as PocketPal is initialised. Its purpose is to
convert the user’s input into structured data which then produces clear instructions for the rest of the program.
Some of its core features include:
- Breaking down user input and extracting the relevant data for further processing.
- Performing input validation and error handling to ensure that input data is in the correct format and ready to be processed.
- Converting the input data into the correct format and returning it as a
Commandclass to be further processed by the application.
Here’s a class diagram that shows only the core structure of the Parser class.
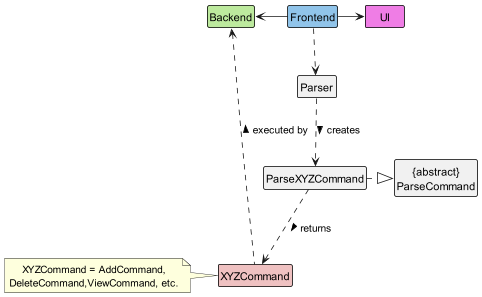
How Parser works:
- When a user enters a command, the
FrontendusesParserto resolve the user input. - Parser creates
ParseXYZCommand(XYZis a placeholder for the various command names[^1] e.g.ParseAddCommand(),ParseDeleteCommand(), etc.), which inherits the abstract classParseCommand, to parse the input for the corresponding command. - Within
ParseXYZCommand, other methods are called to extract and check the validity of the required parameters for that particular command. Any exceptions will be thrown and their corresponding error messages will be shown to the user via theUIclass. - If the user input is valid, an
XYZCommandobject containing the relevant data is created and returned. E.g.ParseAddCommandwould return aAddCommandobject containing the description, price and category. - From there, the
XYZCommandis ready to be executed by theBackend. (AllXYZCommandclasses inherit fromCommandand have correspondingexecute()that carry out their specific instructions.)
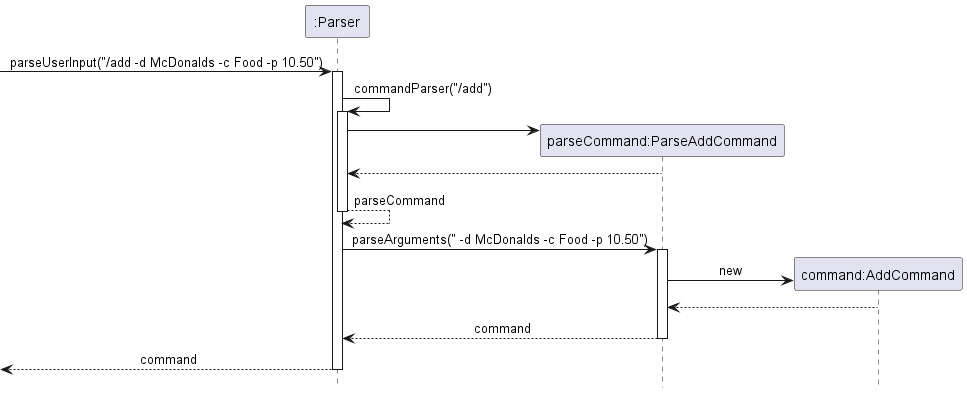
The Sequence Diagram below illustrates the interactions within the Parser component when a user inputs the following
command: /add -d McDonalds -c Food -p 10.50
Commands
Add Command
The add entry mechanism is facilitated by EntryLog. Every instance of AddCommand is created with an Entry
instance.
The following sequence diagram shows how the add command work:
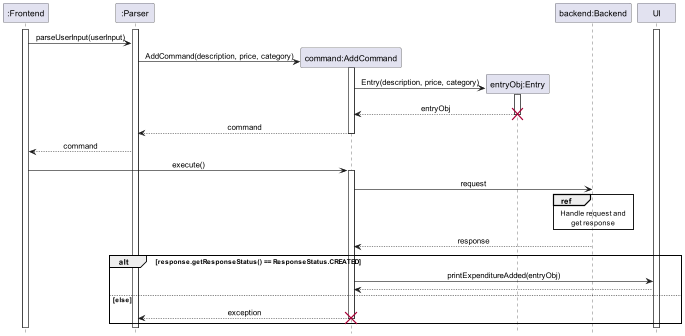
Given below is an example usage scenario and how the add mechanism behaves at each step.
Step 1. The user launches the application for the first time. The EntryLog will be initialized and contains no entry.
Step 2. The user executes /add Lunch at McDonalds -category Food -price 19.9 command to add an Entry to
the EntryLog.
*Note.* The command will fail its execution if its format is incorrect, and no Entry will be added to
the Entrylog. An error message will be displayed informing the user.
Step 3. The command will be resolved by Parser, which would create an AddCommmand object.
Step 4. The AddCommand constructor creates and returns an Entry object containing the description, price and
category to be added.
Step 5. When execute() method is called, a Request object is created.
Step 6. From there, the Request is ready to be handled. addEntry() method is called and the new Entry is added to
the EntryLog.
Step 7. A success message is after the new Entry is added to the EntryLog.
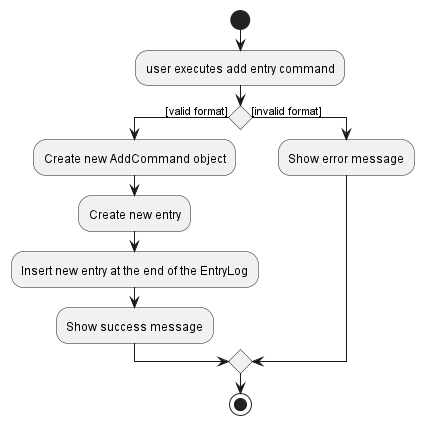
The following activity diagram summarizes what happens when a user executes an add command:
Delete Command
The ‘delete’ entry mechanism is facilitated by EntryLog.
Every instance of DeleteCommand is created with an Integer, which is the ID of the Entry to be deleted.
The following sequence diagram shows how the delete command work:

Given below is an example usage scenario and how the delete mechanism behaves at each step.
Step 1. The user decides to remove an Entry from the EntryLog and executes /delete 1 command.
Note: The command will fail its execution if the index provided is invalid, and no Entry will be removed from
the EntryLog. An error message will be displayed informing the user.
Step 2. The command will be resolved by Parser, which would create an DeleteCommmand object containing the index of
the Entry to be deleted.
Step 3. When execute() method is called, a Request object is created.
Step 4. From there, the Request is ready to be handled. deleteEntry() method is called and the Entry is removed
from EntryLog.
Step 5. A success message is displayed after the Entry is removed from EntryLog.
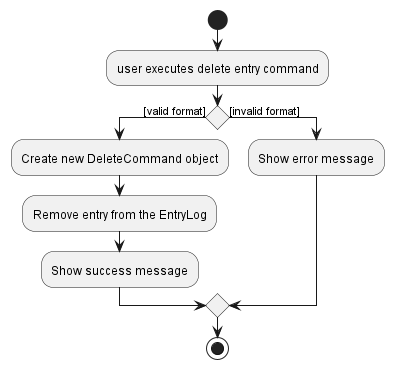
The following activity diagram summarizes what happens when a user executes a delete command:
Edit Command
Overall class diagram for editing an Entry
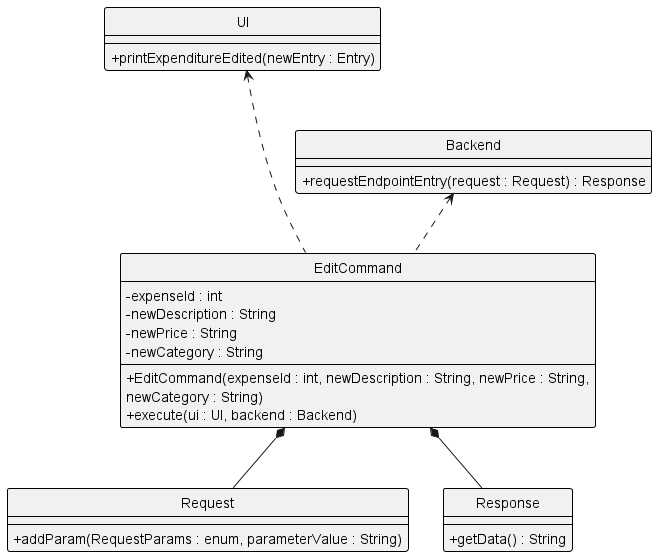
Implementation
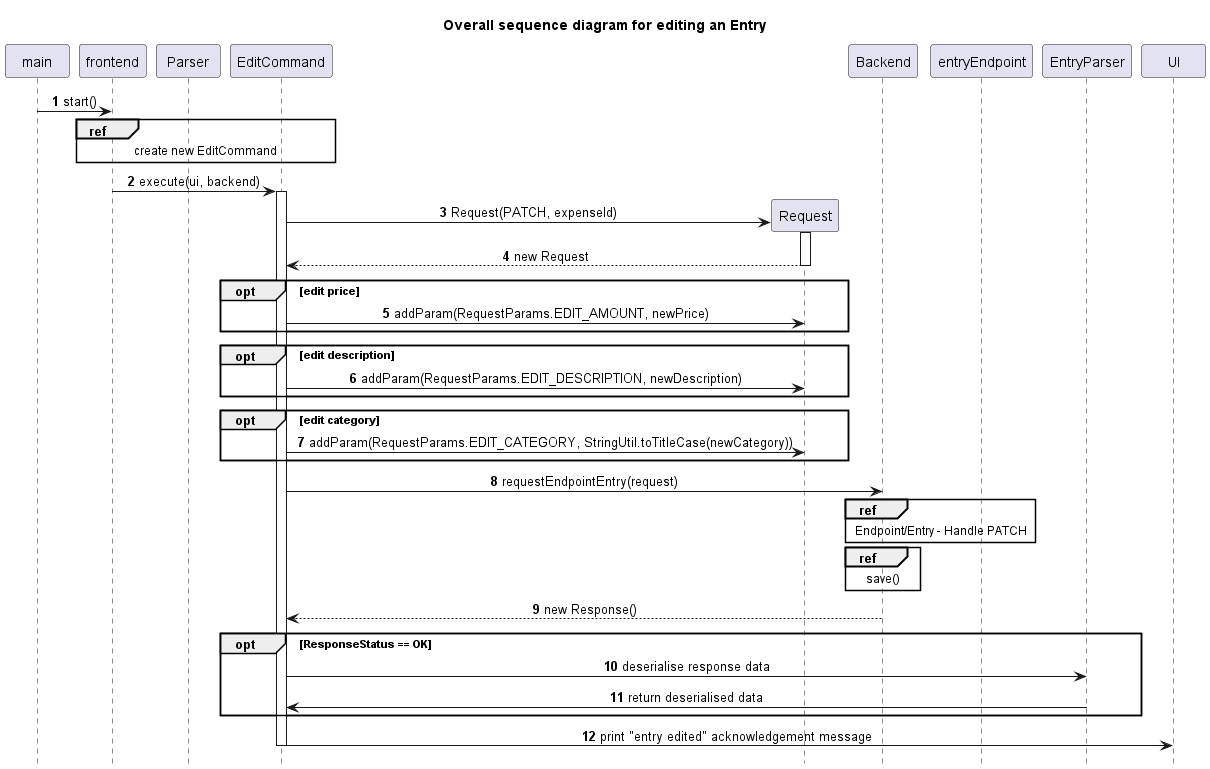
Step 1. User runs Edit command, specifying the ID of the entry to edit, as well as the new attributes of the respective fields.
Step 2. Parser extracts the relevant argument and returns a EditCommand object.
Step 3. The execute method of the EditCommand is called and a Request object is created. This request object specifies the modifications of the various fields.
Step 4. The Request object is then parsed as an argument to the Backend Class, which feeds this request as an argument to a method in the EntryEndpoint class.
Step 5. The EntryEndpoint class then finds and modifies the entry as specified by the user.
Step 6. Upon successful completion of the modification, the EntryEndpoint class returns a Response object to the Backend class. The Response object contains the updated fields of the entry.
However, if the edit operation fails, the response object will contain the relevant exception message which would be printed to the user.
Step 7. The Backend class calls the save() method to update the Storage class with the edited entry.It then returns the Response object to the execute function in the EditCommand object.
Step 8. The printExpenditureEdited method under the UI class is then called in the execute function and an acknowledgement message is printed to the user.
Overall sequence diagram for editing an Entry
View Command
Class diagram of view command
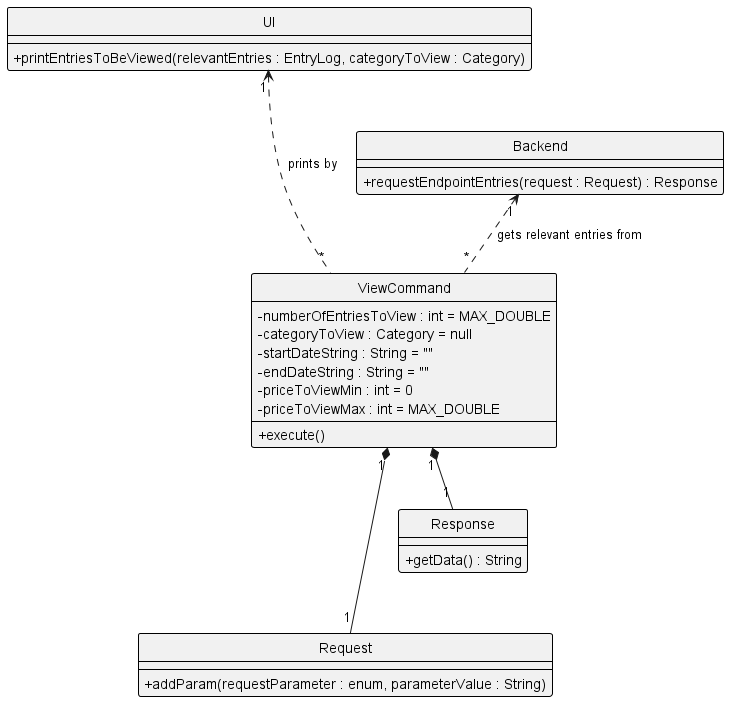 Class diagram above shows the methods called in the execute method of the
View Command object.
Class diagram above shows the methods called in the execute method of the
View Command object.
Implementation
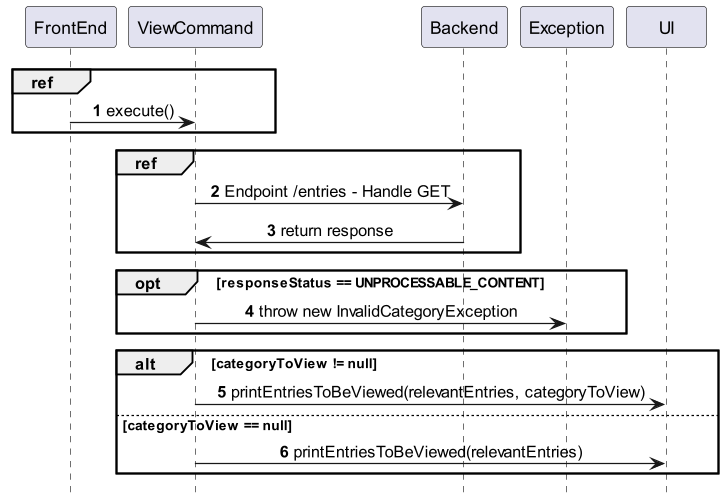
More elaboration about the reference frame [Endpoint /entries - Handle GET] can be found here.
Step 1. String of user arguments is fed into the parseViewCommand method in Parser object.
Step 2. The various filters such as price and dateTime are extracted from the argument String and fed into the constructor of viewCommand.
Step 3. A request object is instantiated, with all the query parameters (eg price) as its attributes.
Step 4. The request is fed into the backend method requestEndpointEntries, which then sends this request to the EntriesEndpoint class.
Step 5. A response object is then returned from EntriesEndpoint. This response contains the serialised form of all relevant entries.
Step 6. The entries are then deserialised and fed into the ui printEntriesToBeViewed method, which prints the details of each entry to the user.
Help Command
The ‘help’ mechanism is facilitated by HelpCommand. It extends the abstract Command with an overriden execute()
method.
The following sequence diagram shows hows the help command work:
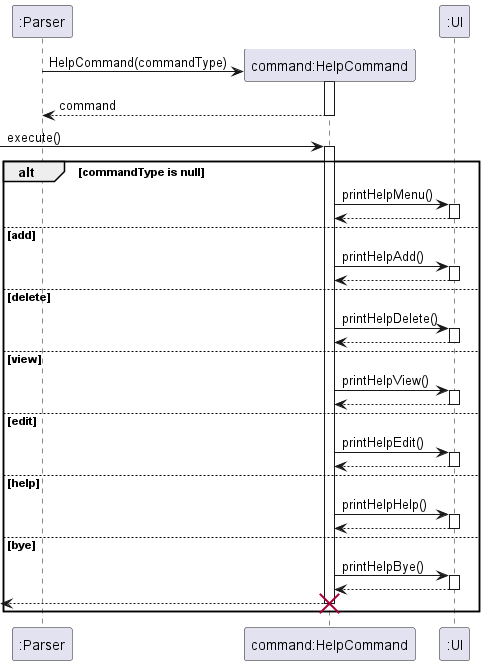
Given below is an example scenario and how the help mechanism behaves at each step.
Step 1. The user decides to view the help guide for add function, and executes /help add.
Note: The command will fail its execution if the command type provided behind help is invalid. An error message
will be displayed informing the user.
Step 2. The command will be resolved by Parser, which instantiates a HelpCommand object using the appropriate
constructor.
Step 3. When execute() method is called, printHelpAdd() method is called from the UI. This method prints out
instructions on how the add command should be used.
Exit/Bye Command
Implementation
Step 1. The Parser extracts the bye command from the user input and calls the parseHelpCommand method.
Step 2. An ExitCommand is returned and since this command is the only command object with the isExit attribute set as “true”, the while loop of the program will terminate since !isExit is the loop condition.
Backend
The API of this component is specified
in Backend.java
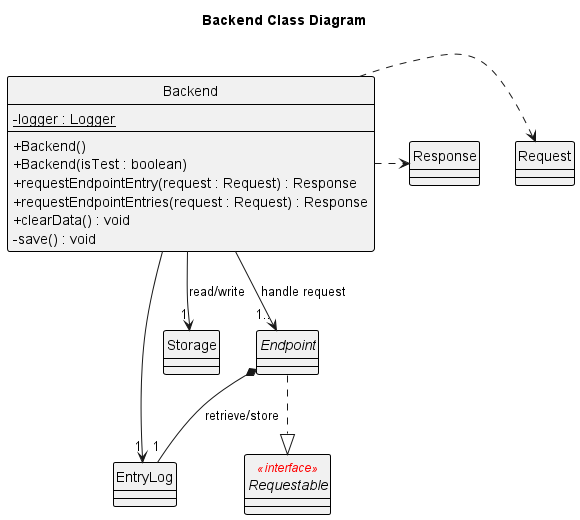
The backend uses a simplified RESTful API approach. This allows us to decouple code using the proven industry practices.
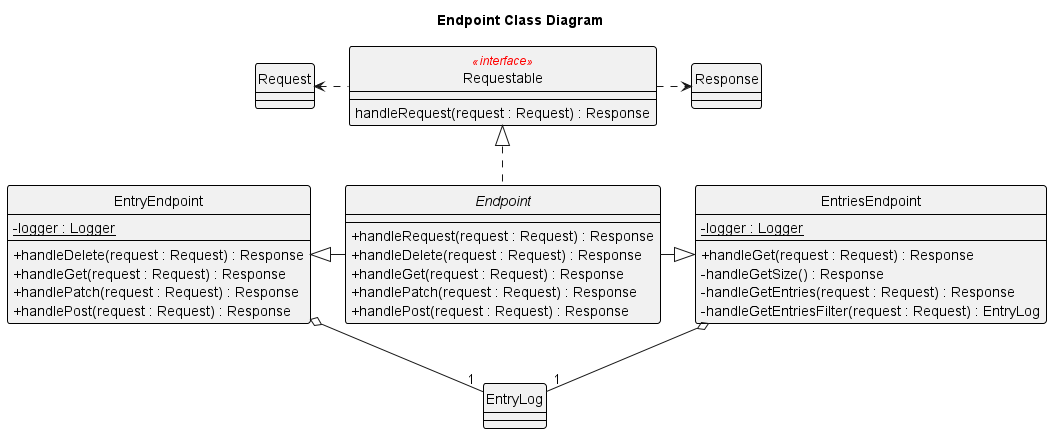
The following diagram illustrates the relationship between various classes involved in Backend as described in
the application architecture.
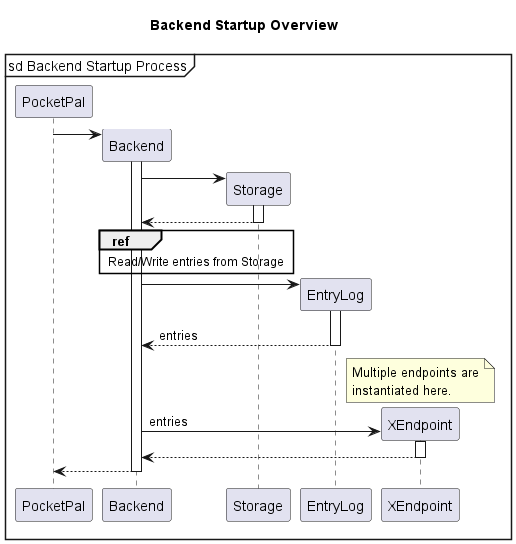
On startup, Backend creates various Endpoint instances, which can be illustrated by the following diagram:
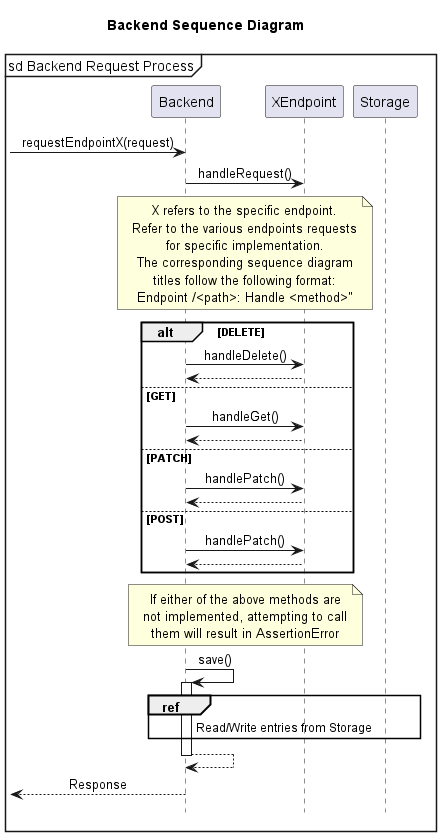
Making a request
When Backend receives a Request from Frontend, the receiving Endpoint will process it based on the request
method and parameters, which can be accessed using Request::getParam(). The request will be processed based on its
method. There are currently 4 methods supported: GET, POST, PATCH, DELETE.
To find out more, visit the following sections:
Storage
The Storage class is responsible for the serialization of Entry data into a csv-like syntax, as well as the
deserialization of that data back into Entry objects.
The main callable functions to be used are:
readFromDatabase()- Deserializes data stored in text form back intoEntryobjects. Executed when PocketPal is instantiatedwriteToDatabase()- SerializesEntryobjects inEntryLoginto text form.reset()- Clears whatever is in the stored text file, without affecting what is in the currentEntryLog.
Reading from Database
The readFromDatabase() method is called from a Backend instance upon its instantiation, and reads from the database
which comes in the form of a text file.
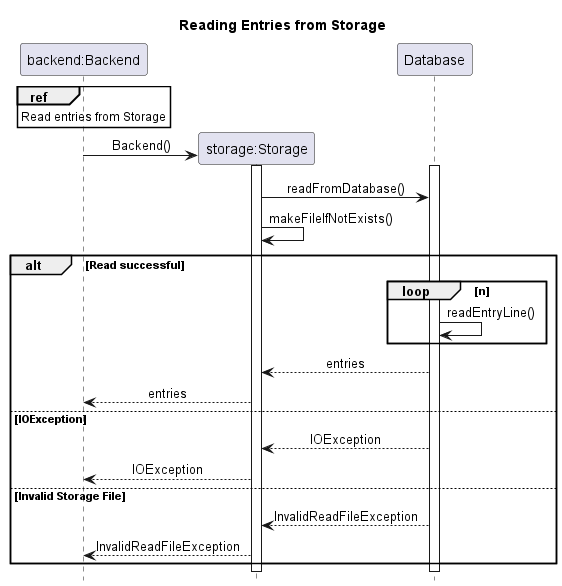
- When a
Backendinstance is created, the constructor will call thereadFromDatabase()method which first callsmakeFileIfNotExists()to create a new database file if it does not exist. - The
readEntryLine()method reads the data from the database file line by line, until there are no more lines to read. It then returns a list ofEntryobjects which is passed back to theBackendinstance to be processed. - Two possible exceptions to be thrown are the
IOExceptionand theInvalidReadFileexceptions.
Writing to Database
The writeFromDatabase() method is called from a Backend instance through the save() method.
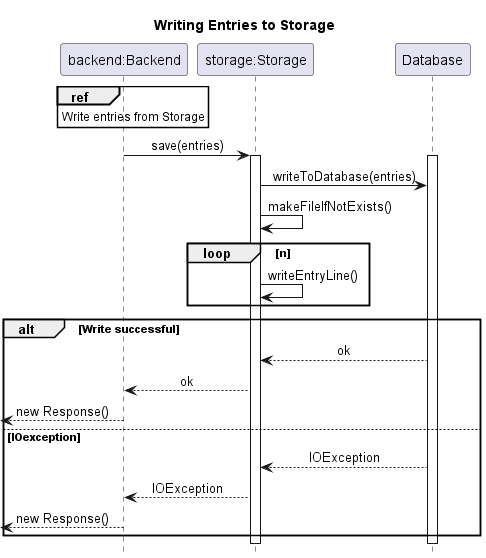
- The
save()method calls thewriteFromDatabase()method which first callsmakeFileIfNotExists()to create a new database file if it does not exist. - The
writeEntryLine()method writes the data into the database file line by line, until there are no more lines to write. If successful, nothing is returned. - An
IOExceptionmight be thrown in this method.
Resetting Database
The reset() method is called from a Backend instance through the clearData() method.
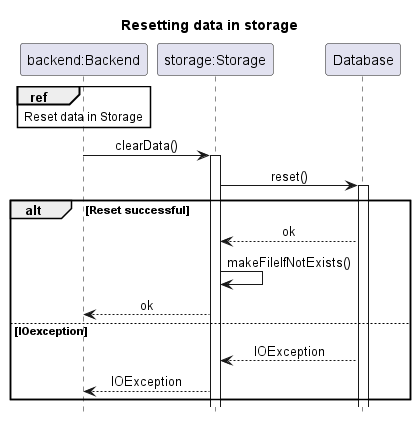
- The
clearData()method calls thereset()method which first deletes the database file, then calls themakeFileIfNotExists()method to create a new database file. If successful, nothing is returned. - An
IOExceptionmight be thrown in this method.
API
Endpoints
The sequence diagram for specific request handling at each endpoint can be viewed at their respective sections.
Each endpoint is a child class Endpoint. Currently, there are 2 endpoints available:
| Endpoint | Method to call |
|---|---|
/entry |
requestEntryEndpoint() |
/entries |
requestEntriesEndpoint() |
Creating a request
- To create a request, simply instantiate
pocketpal.communication.pocketpal.Requestwith the desired request method. - If there are any parameters associated with the request, you may add them using
addParam()
Request req=new Request(RequestMethod.PATCH);
        req.addParam(RequestParams.EDIT_DESCRIPTION,"mango juice");
Making a request
- To call each endpoint, pass the
Requestinto its corresponding method in the frontend. - A
Responsewill be returned to the frontend.
All request body and parameter data should be serialised with
String.valueOf()if not specified.
Backend backend=new Backend();
        Response res=backend.callEntryEndpoint(req);

        if(res.getResponseStatus()!=ResponseStatus.OK){
        // handle status
        }

        Entry entry=EntryParser.deserialise(res.getData());
// process entry
Access all entries available
Get recent or all entries
GET /entries
Sequence diagram
![Entries Endpoint [GET] Sequence Diagram](./static/backend/endpoint/EntriesEndpointGetSequence.png)
Body
Number of recent entries to view if present, otherwise all entries will be returned.
Parameters
GET_SIZE boolean
- If present, response will contain the number of entries.
- Otherwise, the following filters will be applied to the entries:
FILTER_BY_AMOUNT_START double
- If this is the only parameter, it will be used as a minimum amount filter.
- If both filter amount parameters are present, it will be used as a amount range filter.
FILTER_BY_AMOUNT_END double
- If this is the only parameter, it will be used as a maximum amount filter.
- If both filter amount parameters are present, it will be used as a amount range filter.
FILTER_BY_CATEGORY Category
- Filter entries by category
FILTER_BY_QUERY String
- Filter entries by user query
FILTER_BY_TIME_START AND FILTER_BY_TIME_END DateTime (dd/MM/yy HH:mm)
- Filter entries by date and time
- Both parameters are required if used
Responses
| Status Code | Description | Remarks |
|---|---|---|
200 |
OK | Gson-serialised List<Entry>, deserialise with EntryLogParser::deserialise |
422 |
Unprocessable Content | Response message will provide more information on the error (Invalid category, date, ID, etc.) |
Add, modify, view or delete an entry
Add an entry
POST /entry
Sequence diagram
![Entry Endpoint [POST] Sequence Diagram](./static/backend/endpoint/EntryEndpointPostSequence.png)
Body
- Gson-serialised
Entry, obtained usingEntry::serialise
Parameters
N/A
Responses
| Status Code | Description | Remarks |
|---|---|---|
201 |
Created | - |
422 |
Unprocessable Content | Response message will provide more information on the error (Invalid description, amount, etc.) |
View a specific entry
GET /entry
Sequence diagram
![Entry Endpoint [GET] Sequence Diagram](./static/backend/endpoint/EntryEndpointGetSequence.png)
Body
- 1-based index of entry to view Required
Parameters
N/A
Responses
| Status Code | Description | Remarks |
|---|---|---|
200 |
OK | Gson-serialised Entry, deserialise with EntryParser::deserialise |
404 |
Not Found | - |
Delete an entry
DELETE /entry
Sequence diagram
![Entry Endpoint [DELETE] Sequence Diagram](./static/backend/endpoint/EntryEndpointDeleteSequence.png)
Body
- 1-based index of entry to be deleted Required
Parameters
N/A
Responses
| Status Code | Description | Remarks |
|---|---|---|
200 |
OK | Gson-serialised Entry, deserialise with EntryParser::deserialise |
404 |
Not Found | - |
Modify an entry
PATCH /entry
Sequence diagram
![Entry Endpoint [PATCH] Sequence Diagram](./static/backend/endpoint/EntryEndpointPatchSequence.png)
Body
- 1-based index of entry to be deleted Required
Parameters
EDIT_AMOUNT int
- The updated entry amount
EDIT_CATEGORY Category
- The updated entry category
EDIT_DESCRIPTION string
- The updated entry description
Responses
| Status Code | Description | Remarks |
|---|---|---|
200 |
OK | Gson-serialised Entry, deserialise with EntryParser::deserialise |
404 |
Not Found | - |
422 |
Unprocessable Content | - |
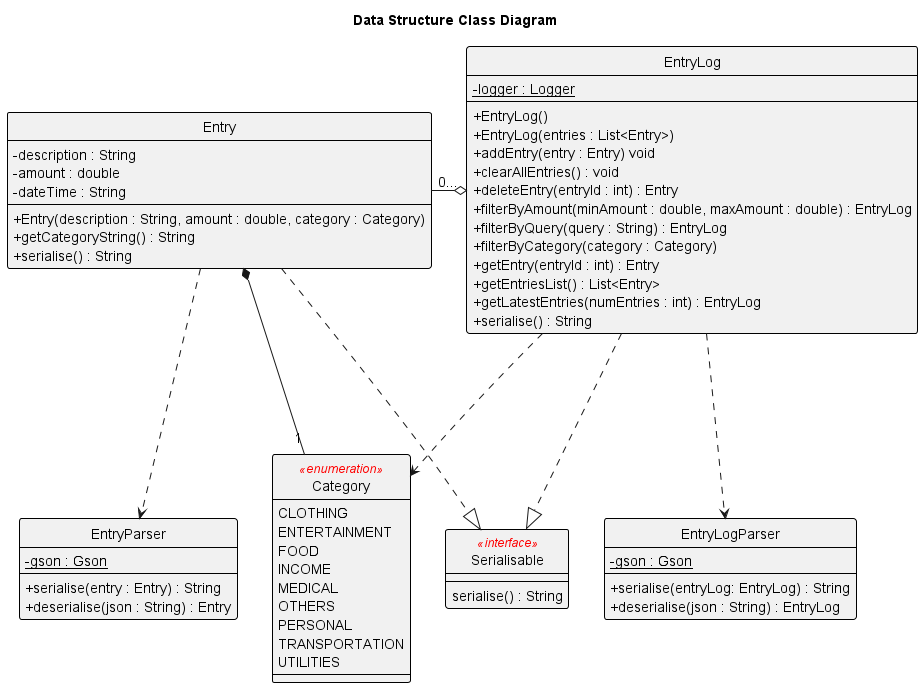
Data Structure
We use the EntryLog data structure to keep track of the entries entered by the user.
Communication
This project uses a simplified HTTP model, where the frontend sends a Request to the backend to perform data-related
operations. The backend returns a Response, which is then processed by the frontend
Testing
Running Tests
We recommend using Gradle to run tests and coding style checks using ./gradlew clean check
Types of Tests
- Unit testing which targets lower level units, such as
pocketpal.data.*,pocketpal.communication.*. - Integration testing is performed in classes which use multiple units, such as
pocketpal.backend.*Endpoint,pocketpal.frontend.*Command, with the assumption that the base units are working.
Unit Test Strategy
We adopt the Arrange, Act, Assert pattern for unit tests in this project.
This allows us to achieve a structured unit tests while balancing code readability and maintainability, and allowing a
clear separation of the setup, operations and results.
For backend testing, we use utility classes such as EntryTestUtil and BackendTestUtil to reduce code repetition and
to simplify the testing process.
Example
@DisplayName("Test /entries [GET]")
class TestEntriesGet extends EntryTestUtil {
    private static final EntryLog expectedEntryLog = new EntryLog();

    @BeforeEach
    void init() {
        TEST_BACKEND.clearData();
        expectedEntryLog.clearAllEntries();
    }

    @Test
    void entriesEndpointGET_recentEntries_correctEntries() {
        // Arrange
        addEntry(ENTRY_1);
        addEntry(ENTRY_2);
        addEntry(ENTRY_3);
        addEntry(ENTRY_4);
        expectedEntryLog.addEntry(ENTRY_3);
        expectedEntryLog.addEntry(ENTRY_4);

        // Act
        Request request = new Request(RequestMethod.GET); // recent 2 entries
        request.addParam(RequestParams.NUM_ENTRIES, "2");
        Response response = TEST_BACKEND.requestEndpointEntries(request);
        EntryLog returnedEntryLog = EntryLogParser.deserialise(response.getData());

        // Assert
        assertEquals(response.getResponseStatus(), ResponseStatus.OK);
        assertTrue(isSameEntryLog(expectedEntryLog, returnedEntryLog));
    }
}
Appendix A: Product scope
Target user profile
PocketPal’s main target users are individuals who are
- Looking for a simplified process of keeping track of their personal expenses.
- Able to type fast
- Comfortable with the use of CLI applications, and might even prefer CLI applications over GUIs
- From all walks of life
Value proposition
For individuals striving to save money for a vacation, a new car, or any other significant purchase, understanding their cash flow is crucial, yet often challenging and time-consuming.
PocketPal revolutionizes the process by offering a seamless, user-friendly experience for tracking both income and expenses. PocketPal empowers users with valuable insights into their spending patterns, enabling them to make well-informed financial decisions and effectively reach their financial milestones.
By delivering a comprehensive and automated overview of users’ income and expenses, PocketPal puts financial control at their fingertips, making the journey towards financial success more attainable and enjoyable.
Appendix B: User Stories
| Version | As a … | I want to … | So that I can … |
|---|---|---|---|
| v1.0 | user | easily input my expenses | add expenses quickly |
| v1.0 | user | view my total expenditure at a glance | plan my finances well |
| v1.0 | user | edit expenditures | correct my mistakes and track my expenditures properly |
| v1.0 | user | delete expenditures | remove wrongly tracked expenditures |
| v1.0 | business owner | have different categories | have better flexibility in planning my budget for different categories |
| v1.0 | user | be able to add my income as well | track my net cash flow |
| v1.0 | less tech savvy user | have a help function | get assistance whenever I’m not sure of how to do something in the app |
| v1.0 | user with many expenses to track | limit the number of expenses displayed | see only a limited number of expenses at a time |
| v2.0 | user with many expenses to track | filter an expense item by description | locate an expense without having to go through the entire list |
| v2.0 | user with many expenses to track | filter an expense item by category | locate an expense without having to go through the entire list |
| v2.0 | user with many expenses to track | filter an expense item by start and end date | locate an expense without having to go through the entire list |
| v2.0 | user with many expenses to track | filter an expense item by minimum and maximum price | locate an expense without having to go through the entire list |
| v2.0 | user with many expenses to track | delete multiple expenses at once | save time by not needing to delete expenses one by one |
| v2.0 | careless user | get accurate feedback and errors when I enter wrong commands | intuitively know how to correct my command |
Appendix C: Non-Functional Requirements
1.The application should be compatible with various operating systems as long as Java 11 or above is installed.
2.The CLI should have an intuitive user interface that is easy to navigate and understand.
3.The application should be stable and not crash under heavy usage.
4.The application should have clear, detailed documentation and code structure so that it is easy to maintain.
5.The User Guide should be well-documented with multiple examples of usage so that it easy to understand.
6.The application should be available at all times, with little dependencies on the internet or other APIs.
Appendix D: Glossary
- Request Method - The action to be performed by the
Endpointrequested (MDN Documentation) - Request Parameter - The details of the action to be performed (Edit category, filter by date, etc.)
- Response Code - The status of the response after a request is made (MDN Documentation)
Appendix E: Instructions for manual testing
Refer to the user guide on launching PocketPal.
Feature Testing
The following section provides instructions and code snippets for the manual testing of all currently supported features in PocketPal.
Do note that the expected output depicted in the test cases below may vary depending on the entries you have added.
Add entry: /add
Usage: /add -d <description> -c <category> -p <price>
Test Case 1 (All required flags are provided):
- Prerequisites: None
- Input:
/add -d McDonalds -c Food -p 10.50
Expected output:
________________________________________________
The following entry has been added:
Description: McDonalds
Price: $10.50
Category: Food
28 Mar 2023, 01:04:42
________________________________________________
Enter a command or /help to see the list of commands available.
Test Case 2 (Missing price flag):
- Prerequisites: None
- Input:
/add -d McDonalds -c Food
Expected output:
________________________________________________
Missing required options:
-p|-price
________________________________________________
Enter a command or /help to see the list of commands available.
View entry: /view
Usage: /view [count] [filter_options]
Test case 1 (No entries exist):
- Prerequisites: Ensure that there are currently no entries added.
- Input:
/view
Expected output:
________________________________________________
There are no entries available.
________________________________________________
Enter a command or /help to see the list of commands available.
Test case 2 (Multiple entries exist):
- Prerequisites: At least 3 existing entries.
- Input:
/view 3
Expected output:
________________________________________________
These are the latest 3 entries.
Total expenditure: $360.50
Total income: $0.00
<1>: McDonalds (Food) - $10.50 <<7 Apr 2023; 15:53>>
<2>: Air Jordan 1 (Clothing) - $200.00 <<7 Apr 2023; 15:53>>
<3>: Birthday Dinner (Food) - $150.00 <<7 Apr 2023; 15:53>>
________________________________________________
Enter a command or /help to see the list of commands available.
Test case 3 (View entries in price range)
- Prerequisites: At least 2 existing entries with price range between $120.50 and $210.00 inclusive.
- Input:
/view -sp 120.50 -ep 210.00
Expected output:
________________________________________________
These are the latest 2 entries.
Total expenditure: $350.00
Total income: $0.00
<1>: Air Jordan 1 (Clothing) - $200.00 <<7 Apr 2023; 15:53>>
<2>: Birthday Dinner (Food) - $150.00 <<7 Apr 2023; 15:53>>
________________________________________________
Enter a command or /help to see the list of commands available.
Delete entry: /delete
Usage: /delete <index> [additional_index...]
You may view the list of existing entries along with their corresponding indexes with /view.
Test case 1:
- Prerequisites: At least 3 entries pre-added into the program.
- Input:
/delete 3
Expected output:
________________________________________________
The following entry has been deleted:
Description: Birthday Dinner
Price: $150.00
Category: Food
28 Mar 2023, 01:03:39
________________________________________________
Enter a command or /help to see the list of commands available.
Test case 2
- Prerequisites: Fewer than 20 entries pre-added into the program
- Input:
/delete 20
Expected output:
________________________________________________
Item ID does not exist: 20
Please specify a valid integer from 1 to 2147483647!
________________________________________________
Enter a command or /help to see the list of commands available.
Test case 3
- Prerequisites: At least 2 entries pre-added into the program
- Input:
/delete 1 2
Expected output:
________________________________________________
The following entry has been deleted:
Description: Light bulb
Price: $10.20
Category: Utilities
28 Mar 2023, 01:04:42
________________________________________________
The following entry has been deleted:
Description: Pizza
Price: $8.30
Category: Food
28 Mar 2023, 01:04:30
________________________________________________
Enter a command or /help to see the list of commands available.
Edit entry: /edit
Usage: /edit <index> [options]
Test case 1 (Editing all flags)
- Prerequisites: At least 2 entries pre-added into the program.
- Input:
/edit 2 -p 300.50 -c others -d MacBook Air
Expected output:
________________________________________________
The following entry has been updated:
Description: MacBook Air
Price: $300.50
Category: Others
7 Apr 2023; 16:22
________________________________________________
Enter a command or /help to see the list of commands available.
Test case 2 (Editing price only)
- Prerequisites: At least 2 entries pre-added into the program, with the 2nd entry matching the one shown in the example above.
- Input:
/edit 2 -p 300.50
Expected output:
________________________________________________
The following entry has been updated:
Description: MacBook Air
Price: $300.50
Category: Others
7 Apr 2023; 16:22
________________________________________________
Enter a command or /help to see the list of commands available.
Show help menu: /help
Usage: /help
Test case
- Prerequisites: None.
- Input:
/help
Expected output:
________________________________________________
PocketPal is an expense tracking app, optimised for use via a Command Line Interface.
Users can take advantage of the input flags for entering entries quickly.
Listed below are the various commands that are currently supported.

Add - Adds an entry to your current account.
Usage: /add -d <description> -c <category> -p <price>
Options:
-d <description>
-c <category>
-p <price>
See below for examples
/add -d Apple Macbook Air -p 1300 -c Personal
/add -p 1300 -c Personal -d Apple Macbook Air

Delete - Deletes specified entry(s) from your account.
Usage: /delete <index> [additional_index...]
See below for examples
/delete 10 11 13
/delete 1

Edit - Edits a specified entry in your account.
Usage: /edit <index> [options]
Options:
-d <description>
-c <category>
-p <price>
See below for examples
/edit 5 -d Grab to school -c Transportation -p 20.00

View - Displays a list of your current entries.
Usage: /view [count] [filter_options]
Filter options:
-c <category>
-sp <startprice>
-ep <endprice>
-sd <startdate>, -ed <enddate>
See below for examples
/view 100 -c Transportation -sp 2.00 -ep 5.00
/view -sd 21/11/1997 -ed 22/11/1997 -c Transportation -sp 2.00
/view 10 -sd 21/11/1997 -ed 22/12/1997 -c Transportation -sp 2.00 -ep 6.00

Help - Displays the help menu.
Usage: /help

Exit - Terminates PocketPal.
Usage: /bye
________________________________________________
Enter a command or /help to see the list of commands available.
Terminate program: /bye
Usage: /bye
Test case
- Prerequisites: None.
- Input:
/bye
Expected output:
________________________________________________
Bye. See you again :)
________________________________________________
More test cases will be added as more features are introduced.
Appendix F: Testing with sample data (from file)
PocketPal stores data in a storage.txt file under the “data/” directory. Each row in the “storage.txt” file represents a single Entry. Each column in each row should have 3 columns, representing the description of the Entry, amount associated with the Entry and category of the Entry in that order, and are separated with the “,” delimiter. All of them are in the String format.
An example storage.txt file that will be readable by PocketPal is as such:
Apple Juice,5.50,Food
Bus Card,50,Transportation
Paracetamol,10.39,Medical
which will give us 3 Entries.
As of the time of writing, the available categories are:
- Clothing
- Entertainment
- Food
- Medical
- Others
- Personal
- Transportation
- Utilities
- Income
An empty input for category is not allowed. If necessary, use the “Others” category.
Exceptions
Exceptions are thrown for a couple of cases where files are being read. If you wish to test the exceptions, they can be replicated as follows:
- Delimiter is invalid: If the delimiter is not the comma (“,”), it is not recognised as a delimiter and will not be
processed correctly.
Example row: Apple Juice 5.50 Food - In this case, the pipe (“ ”) is used as a delimiter, which is not allowed. - Amount is invalid: If the amount is not a numeric, it is not recognised as a valid amount and will not be processed
correctly.
Example row: Apple Juice,5A6B,Food - In this case, the amount is “5A6B”, which is not a numeric and therefore not allowed.
- Category is invalid: If the category is not a string from the list of allowed categories (see above), it is not
recognised as a valid category and will not be processed correctly.
Example row: Apple Juice,5.50,Drink - In this case, the category is “Drink”, which is not a valid category and therefore not allowed.
- Not enough columns: If a row has insufficient columns compared to what is needed, the Entry cannot be created.
Example row: Apple Juice,5.50 - In this case, there are only two categories which is not allowed.